

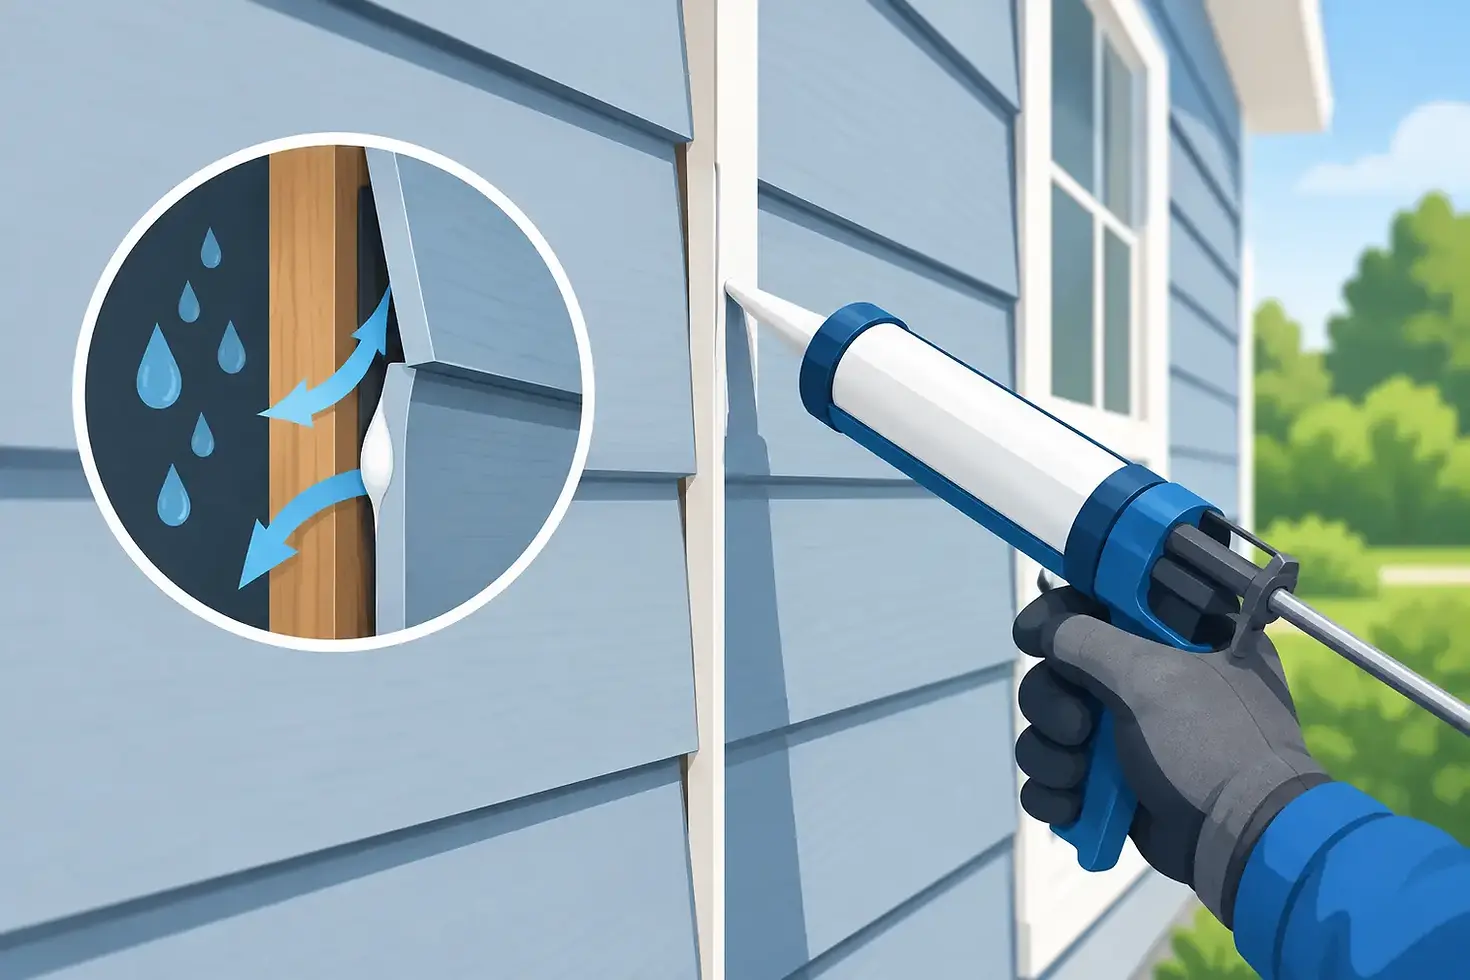
How to Seal Siding Gaps Without Trapping Water

A small opening beside a window, under a siding panel, or where two exterior materials meet can let in more than cold air. In Ottawa-area homes, wind-driven rain, freeze-thaw cycles, and insects can turn an overlooked gap into stained sheathing, soft trim, or a drafty room. Knowing how to seal siding gaps starts with one rule: seal the right areas, but do not block the paths siding uses to shed water.
Siding is part of a layered wall system. The visible panels protect the house, while flashing, housewrap, trim, and drainage space behind the siding manage the water that gets past the surface. A tube of caulk is useful, but using it in the wrong place can trap moisture where it does the most damage.
Start by Finding Out Why the Gap Is There
Before applying sealant, inspect the gap closely. Some openings are normal. Vinyl siding, for example, expands and contracts with temperature changes. Panels need room to move in their channels, and the lower edges of siding panels are designed to drain. Caulking these locations can cause buckling or hold water behind the siding.
Other gaps point to a repair need. Look for cracked caulk around windows and doors, loose J-channel, missing trim, separated corner posts, damaged flashing, warped boards, or siding that has pulled away from the wall. If the gap is large enough to see dark staining, deteriorated wood, exposed housewrap, or insulation, the problem is likely beyond a simple sealant repair.
Check the area after a heavy rain if possible. Water marks below a gap, peeling interior paint, or a musty smell indoors are signs that moisture may already be entering the wall. In that situation, sealing the outside opening without investigating further can hide an active leak.
Where Caulk Belongs and Where It Does Not
The most common places to seal are stationary joints: where trim meets siding, where siding meets a window or door casing, around penetrations for pipes and vents, and where siding meets masonry or another fixed exterior material. These areas often benefit from a flexible exterior-grade sealant.
Do not caulk the horizontal laps of vinyl siding, the bottom edge of siding panels, weep holes, or the ends of panels inside J-channel. Those spaces allow drainage and movement. The same caution applies to intentional openings in brick veneer and certain trim systems.
Wood and fiber-cement siding have different details than vinyl, but the principle is the same. Seal end cuts, vertical trim joints, and transitions where the manufacturer calls for sealant. Leave drainage details open. If you are unsure whether an opening is intentional, it is better to identify the siding system first than to fill it blindly.
Choose Materials That Match the Repair
For most exterior siding and trim joints, use a high-quality paintable exterior sealant rated for the materials you are joining. Acrylic latex products are easy to tool and clean up, but they may not last as long in areas with significant movement. Polyurethane and hybrid sealants generally offer stronger adhesion and flexibility, though they require more careful application and cleanup.
Avoid using interior caulk outdoors. It can crack, shrink, or lose adhesion after repeated exposure to sun, moisture, and temperature swings. Also avoid relying on expanding spray foam for visible exterior gaps. Foam can absorb moisture, break down in sunlight, and create an untidy repair. It may have a limited role inside a protected wall cavity, but it is not a substitute for proper exterior flashing, trim, or siding repair.
For a gap wider than about 1/4 inch, install foam backer rod before caulking. Backer rod controls the depth of the sealant joint and helps the caulk stretch as materials move. The goal is a flexible seal across the opening, not a deep, solid mass of caulk that may split during the next winter.
Keep the following on hand before starting:
Exterior-grade sealant compatible with the siding and trim materials
Caulk gun, utility knife, and a stiff scraper
Foam backer rod for larger joints
Mild cleaner, brush, and clean rags
Replacement trim, flashing, or fasteners if the inspection reveals damage
How to Seal Siding Gaps Step by Step
1. Work in dry, suitable weather
Choose a dry day when temperatures fall within the sealant manufacturer's application range. Many products do not cure properly on wet surfaces or during cold weather. The siding and trim should be dry to the touch, with no frost or condensation present.
2. Remove failed caulk and loose material
Cut out old, cracked, or detached caulk with a utility knife or scraper. Do not simply apply a new bead over failing material. The new sealant is only as reliable as the surface beneath it.
Brush away dirt, loose paint, insect debris, and chalky residue. Wash the area if needed, then allow it to dry fully. If you uncover soft wood, crumbling trim, or rusted flashing, stop there and plan for a repair rather than sealing over the damage.
3. Correct the siding or trim position first
A bead of caulk should not be used to hold loose siding in place. Refasten or replace a loose piece of trim, repair a damaged corner, and make sure siding panels are seated correctly before sealing stationary joints.
With vinyl siding, be especially careful not to nail through the face of a panel or fasten it so tightly that it cannot move. A siding repair that restricts movement can create fresh gaps elsewhere as temperatures change.
4. Add backer rod where needed
Press backer rod into deep or wide joints with a blunt tool. It should sit evenly below the surface, leaving enough depth for a proper sealant bead. Do not puncture it or force it so deeply that the caulk bead becomes too thick.
Backer rod is particularly helpful at trim-to-siding transitions, around older window casings, and at joints where seasonal movement has repeatedly cracked previous caulk.
5. Apply a continuous, controlled bead
Cut the nozzle at a slight angle to match the width of the joint. Apply steady pressure and run one continuous bead along the gap. A consistent bead is more dependable than several short, overlapping passes.
Tool the caulk immediately with a caulk-finishing tool or a gloved finger lightly dampened as directed by the manufacturer. The finished bead should bond to both sides of the joint and form a slightly concave surface that sheds water. Wipe away excess before it cures.
6. Let it cure before painting or exposing it to heavy rain
Cure time varies by product, temperature, and humidity. Do not paint too early, and do not assume a bead that feels dry on the surface has cured all the way through. Follow the product label, especially during cool or damp weather.
Do Not Ignore Flashing Problems
Caulk is not a replacement for flashing. If a gap is above a window, door, roof-to-wall connection, deck ledger, or horizontal trim board, water management may depend on metal or membrane flashing behind the siding.
A common mistake is sealing the face of a poorly flashed joint while leaving the real water path untouched. Water can still get behind the siding, then become trapped by the new caulk. This is why recurring gaps, staining, or leaks around windows and rooflines should be inspected by an experienced exterior contractor.
The same applies if the siding has been damaged by wind, ice, or a roof drainage problem. Overflowing gutters can repeatedly soak fascia, trim, and siding edges. Fixing the drainage issue is often just as important as sealing the visible opening.
When a Professional Repair Makes More Sense
A homeowner can usually handle small, accessible caulk failures on sound trim. Call for professional help when gaps are high on the wall, siding is loose across a larger area, water has entered the home, or you see rot, mold, bent flashing, or damage around windows and rooflines.
For homes in Ottawa and surrounding communities, winter movement and heavy weather can expose weaknesses that were not obvious in milder months. Sky High Roofing & Siding can assess whether the issue is a straightforward siding repair, a flashing correction, or part of a larger roofline and drainage concern.
A well-sealed exterior should still be able to drain, move, and dry. Take the time to repair the cause of the gap, use materials suited to the joint, and leave the intentional drainage openings alone. That approach protects the wall behind the siding, where the most expensive damage usually begins.


Comments